
How to Integrate Salesforce with GitHub.


In this blog, you will learn how you can Integrate salesforce with github.

Steps:

1) You have to create a GitHub account, I already have my GitHub account, so I will move ahead.

2) You have to download the git-bash(https://git-scm.com/downloads). you have to setup Username Password in gitbash of your github account.

3) Then open your chrome or any other browser, search for https://api.github.com/ .It will give you like this :

To get GitHub Data into Salesforce portal.


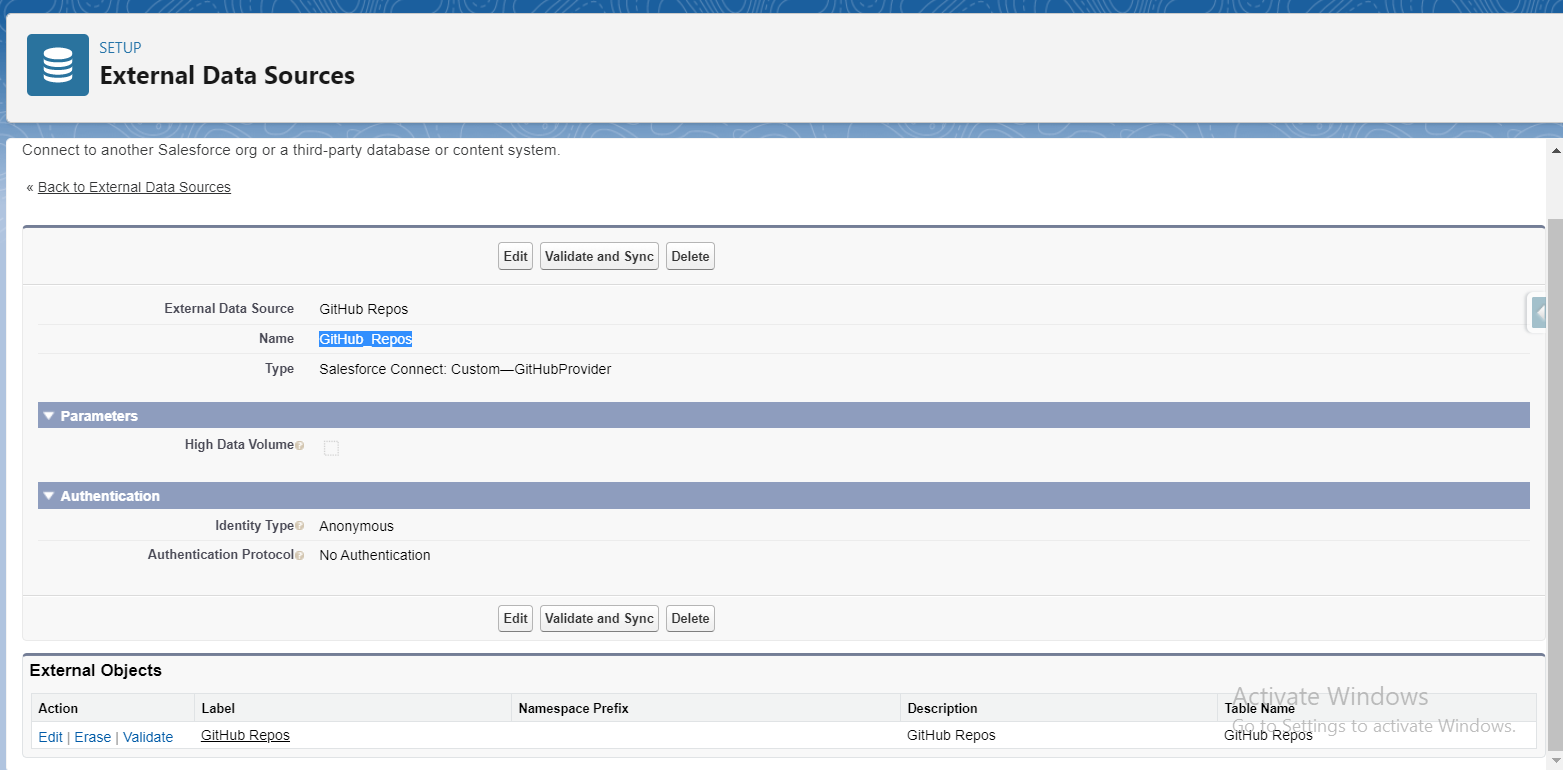
1) Login to Salesforce. Go to Setup -> In the quick find box -> search 'External data source'.

2) Create new External data source with name GitHub_Repos .


3) Create a Github tab like this:


4) Create Apex Classes and paste the below code on your developer console.

GitHubProvider.cls :-

global with sharing class GitHubProvider extends DataSource.Provider{
    override global List<DataSource.Capability> getCapabilities() {
        List<DataSource.Capability> capabilities = new List<DataSource.Capability>();
        capabilities.add(DataSource.Capability.ROW_QUERY);
        return capabilities;
    }
   
    override global List<DataSource.AuthenticationCapability> getAuthenticationCapabilities() {
        List<DataSource.AuthenticationCapability> capabilities =
                            new List<DataSource.AuthenticationCapability>();
        capabilities.add(DataSource.AuthenticationCapability.ANONYMOUS);
        return capabilities;
    }
   
    override global DataSource.Connection getConnection(DataSource.ConnectionParams connectionsParams) {
        return new GitHubConnection();
    }
}

GitHubConnection.cls :-

global with sharing class GitHubConnection extends DataSource.Connection{
    override global List<DataSource.Table> sync() {
        List<DataSource.Column> gitHubRepoColumns = new List<DataSource.Column>();
        gitHubRepoColumns.add(DataSource.Column.text('ExternalId', 255));
        gitHubRepoColumns.add(DataSource.Column.url('DisplayUrl'));
        gitHubRepoColumns.add(DataSource.Column.text('Name', 128));
        gitHubRepoColumns.add(DataSource.Column.text('Description', 1024));
        gitHubRepoColumns.add(DataSource.Column.number('Stars', 16, 0));
       
        List<DataSource.Table> tables = new List<DataSource.Table>();
        tables.add(DataSource.Table.get('GitHub Repos', 'Name', gitHubRepoColumns));
        return tables;
    }
   
    override global DataSource.TableResult query(DataSource.QueryContext queryContext) {
        List<Map<String, Object>> repos =
            DataSource.QueryUtils.process(queryContext, getOrgRepos('<USERNAME>'));
        DataSource.TableResult tableResult = DataSource.TableResult.get(queryContext, repos);
        return tableResult;
    }
   
    override global List<DataSource.TableResult> search(DataSource.SearchContext searchContext) {
        return DataSource.SearchUtils.searchByName(searchContext, this);
    }
   
    public List<Map<String, Object>> getOrgRepos(String org) {
        Http httpProtocol = new Http();
        HttpRequest request = new HttpRequest();
        String url = 'https://api.github.com/orgs/' + org + '/repos?per_page=1000';
        request.setEndPoint(url);
        request.setMethod('GET');
        HttpResponse response = httpProtocol.send(request);
       
        List<Map<String, Object>> repos = new List<Map<String, Object>>();
       
        for (Object item : (List<Object>)JSON.deserializeUntyped(response.getBody())) {
            Map<String, Object> repo = (Map<String, Object>)item;
            repo.put('ExternalId', repo.get('id'));
            repo.put('DisplayUrl', repo.get('html_url'));
            repo.put('Name', repo.get('name'));
            repo.put('Description', repo.get('description'));
            repo.put('Stars', repo.get('stargazers_count'));
            repos.add(repo);
        }
       
        return repos;
    }
}

5) Go to App launcher and search for GitHub Repos.
It will automatically brings all the files which are in the query.
6) To Create new Branch from the Parent/Main branch. You have to just call the Api.

postGitHub.cls :-

public with sharing class postGitHub {
    public static String postGit(){
        try {
            String json = '{ "ref": "refs/heads/Username", "sha": "SHA" }'; // you have to put your head.
            Http http = new Http();
            HttpRequest request = new HttpRequest();
           //you have to put the endpoint of your repository.            
            request.setEndPoint('https://api.github.com/repos/<USERNAME>/<REPO>/git/refs');
            request.setMethod('POST');
            request.setHeader('Authorization',"Token " + 'YOUR_TOKEN_HERE');
            //
            request.setBody(json);
            HttpResponse response = new HttpResponse();
            response = http.send(request);
            System.debug(response.getStatusCode());
            System.debug(response);

        } catch (Exception e) {
            System.debug(e.getMessage());
        }
        return 'success';

    }
}

After that you can check a new branch is created into your github portal.


 DEMO :- 


Comments

Popular Posts

Top 100 Most common used Apex Method in Salesforce

  Here are 100 more Apex methods in Salesforce: 1.       insert: Inserts records into the database. 2.       update: Updates records in the database. 3.       delete: Deletes records from the database. 4.       upsert: Updates or inserts records into the database. 5.       query: Retrieves records from the database using SOQL. 6.       getContent: Retrieves the content of a document or attachment. 7.       getContentAsPDF: Generates a PDF file from a Visualforce page or HTML content. 8.       addError: Adds a custom error message to a record and prevents saving. 9.       start: Initiates processing in batch Apex. 10.    execute: Processes a batch of records in batch Apex. 11.    finish: Finalizes processing in batch Apex....

How to create ICS/Calendar File | Helps you to download the calendar invites

  Want to know how to create ICS(Internet Calendar Scheduling) file for Business purpose....👀    ICS (Internet Calendar Scheduling) file is a calendar file saved in a universal calendar format used by several email and calendar programs, including Microsoft Outlook, Google Calendar, Notes and Apple Calendar. It enables users to publish and share calendar information on the web and over email. Lets see the code. The code is written in lwc(Lightning web component). HTML:   <template> <div class="login-container"> <h1 style="size: 14px;"><b>Create ICS File</b></h1> <div class="form-group"> <lightning-input type="datetime" name="input1" value={EventEndValue} onchange={startDate} label="Enter Start date/time value" ></lightning-input> </div> <div class="form-group"> <lightning-input type="...

Sharing records by Apex in Salesforce

  Greetings, everyone! In today's session, we'll delve into the topic of sharing records within an Apex class. As we're aware, there exist various methods through which we can accomplish the sharing of records. We engage in record sharing primarily when the object's Organization Wide Default (OWD) settings are set to private. Sharing settings come into play when certain predefined criteria are met, allowing us to extend access to records to designated groups or roles. In cases where intricate logic is involved, manual sharing is employed. While this approach proves beneficial for specific records, instances where a multitude of records require automated handling, Apex sharing becomes the preferred solution. Salesforce offers a 'Share' object for each type of object, with distinct naming conventions: For standard objects, it's 'StandardobjectName+Share', such as 'AccountShare' for the 'Account' object. Custom objects follow the pattern...

Login Salesforce Without Credentials(Without UserName and Password)

  Want to login into Salesforce without credentials. Please follow the below STEPS: STEPS:-  1)  Goto to setup  --> Open Developer Console. 2) Goto debug --> Open Execute Anonymous Window --> It will open the pop. 3) Please write the below code in Anonymous window.       String sessionId = UserInfo.getOrganizationId() + '' + UserInfo.getSessionId().SubString(15);      System.debug('$$$$ Session Id ' + sessionId); 4) Click on Execute and filter the debug. You can see one session Id with Organization Id. Now, we have to copy the debug session Id and create one login URL. Steps to create Login URL: 1) Copy the Salesforce URL. Please refer the screenshot shown below. 2) Now concatenate the session Id with the salesforce URL and your Session Id Will look like below. https://d5g000004zfq2eai-dev-ed.lightning.force.com/secur/frontdoor.jsp?sid=00D5g000004zfQ2EAI!AQgAQKzTcnQTifXpRnQ7DgECtk_rv.w9BT5FoPEAmoy_UrgG4HJ6B9YFpQ2LVlmnJhBrYPSf8cI...

SF Fact #03 | Undelete Failed, Entity is not in recycle bin

  Similar to ENTITY_IS_DELETED error, if we attempt to undelete a record from recycle bin by mistake which has already been hard deleted, the following error is encountered: UNDELETE_FAILED. When a record is deleted, it moves to the Recycle Bin. This is known as "soft deletion," allowing the record to be easily restored through the user interface. However, under certain conditions, a deleted record will no longer appear in the Recycle Bin: Master-Detail Relationship (Child Deleted First): If a record is a child or detail in a master-detail relationship and it is deleted before its parent record, then after the parent is deleted, the child record transitions to a "hard deleted" status. In this state, the child record cannot be recovered through the Recycle Bin and must be recreated if needed. Master-Detail Relationship (Parent Deleted): If a record is a child or detail in a master-detail relationship and the parent record is deleted, the child record is also soft del...