
LWC Enhancements for Developers


The Spring '23 release brings an abundance of exciting new features. Among these are enhancements to Lightning Web Components (LWCs) that aim to boost productivity, enhance security, and provide other useful utilities. These improvements facilitate debugging of LWC wired properties, enable synchronized component data without the need for page refreshes, introduce enhanced security layers for both LWC and Aura components, and offer additional tools for improved component testing. In this blog post, we will delve into the details of these updates.

View debug information for your wired properties

Inspecting Wired Properties with Debug Information
Starting from Spring '23, debugging wired properties and methods becomes more straightforward through custom formatters in the Chrome debugger. Previously, developers had to use a wired function to retrieve deconstructed data and error properties for inspection. This new feature eliminates the need for rewriting wired properties and seamlessly integrates with Chrome DevTools.

To get started with debugging, enable debug mode in your organization and open Chrome DevTools to activate custom formatters. You can witness this debugger in action by examining the 'apexWireMethodToProperty' component from the 'lwc-recipes' repository, which serves as an example of a custom component utilizing a wire adapter.


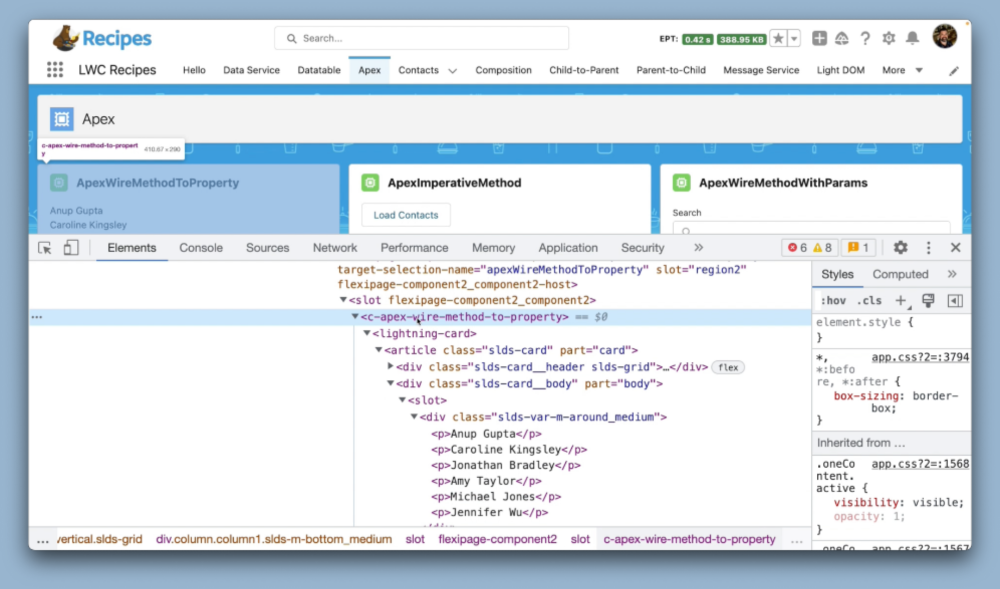
Once you have your custom component rendered in your organization, simply click on the element (e.g., <c-apex-wire-method-to-property>) in the Elements panel of Chrome DevTools. Afterward, open the Console panel and enter $0 to access the debug information. Alternatively, you can capture or log the 'this' value of the element from your JavaScript code.


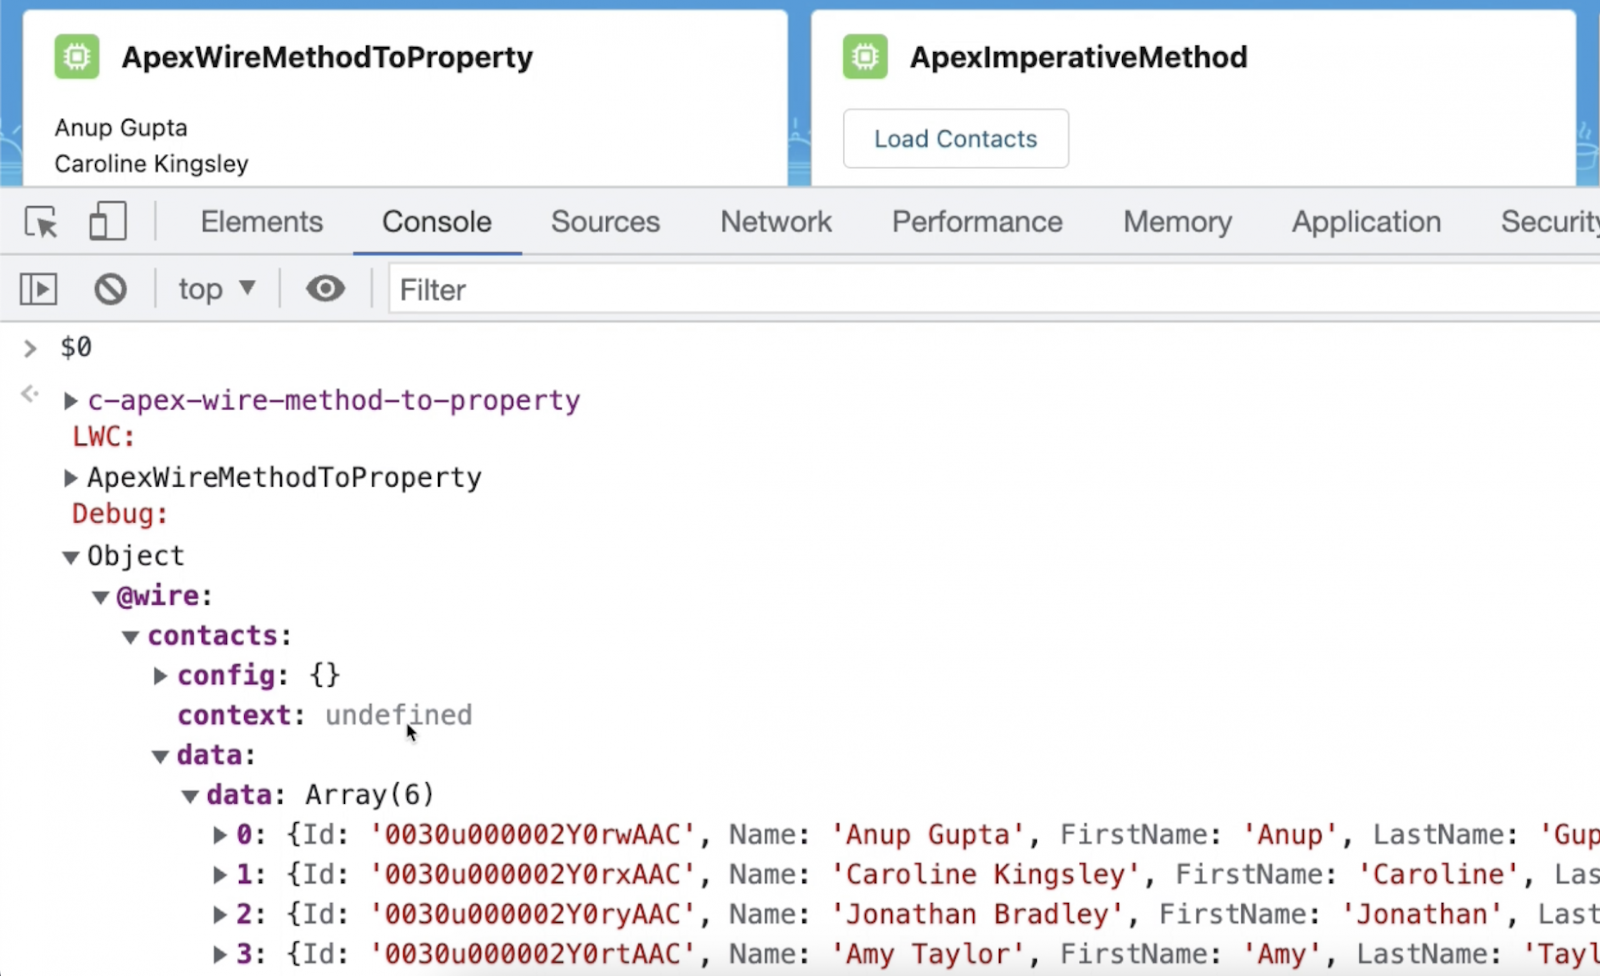
Each wired property or method returns information in the following format:

-> 'data': The most recent value returned by the wire adapter
-> 'config': The last configuration object reported to the wire adapter
-> 'context': Relevant for context wire adapters only
-> 'isDataProvisionedForConfig': A boolean indicating whether the data provisioned by the wire adapter corresponds to the configuration; returns 'true' if the adapter emits data after a config was reported.


Query DOM elements with refs

The Spring '23 release introduces a new Template Refs API, simplifying the process of referencing LWC template elements during runtime without the need for querySelector. This API functions consistently with both shadow DOM and light DOM-rendered LWCs.

Creating references is straightforward; you add the 'lwc:ref' attribute to an element with a value serving as the reference name in your JavaScript code.

<template>
    <div lwc:ref="myelement">...</div>
</template>

With this setup, you can easily access the referenced element from your LWC object using 'this.refs'. This prevents your LWC from mistakenly selecting references, particularly DOM elements from external, non-encapsulated DOM trees when using light DOM components.

import { LightningElement } from 'lwc';

export default class extends LightningElement {
    renderedCallback() {
        console.log(this.refs.myelement);
    }
}

Notably, the template refs API eliminates the need for elements to have IDs or classes, which were previously required for querySelector.

Enhanced Conditional Directives

Spring '23 brings improvements to LWC templates with simplified conditional directives, including 'lwc:if', 'lwc:else', and 'lwc:elseif' attributes. In comparison to the previous 'if:true' and 'if:false' directives, these new conditional directives streamline your component's performance while reducing the amount of code you need to write.

For example, the same conditional rendering that used to require 'if:true' and 'if:false' can now be achieved more concisely:

<template>
    <template lwc:if={abra}>
        Abra!
    </template>
    <template lwc:elseif={kadabra}>
        Kadabra!
    </template>
    <template lwc:else>
        Alakazam!
    </template>
</template>

Accessibility changes to the Lightning Design Systems icons

Spring '23 brings subtle modifications to the SLDS icons in order to enhance their accessibility and align them with current web standards. These adjustments ensure compliance with the color contrast recommendations outlined in the Web Content Accessibility Guidelines (WCAG) 2.1.


                                                   Happy Coding And Thanks EveryOne!!!


Comments

Popular Posts

Top 100 Most common used Apex Method in Salesforce

  Here are 100 more Apex methods in Salesforce: 1.       insert: Inserts records into the database. 2.       update: Updates records in the database. 3.       delete: Deletes records from the database. 4.       upsert: Updates or inserts records into the database. 5.       query: Retrieves records from the database using SOQL. 6.       getContent: Retrieves the content of a document or attachment. 7.       getContentAsPDF: Generates a PDF file from a Visualforce page or HTML content. 8.       addError: Adds a custom error message to a record and prevents saving. 9.       start: Initiates processing in batch Apex. 10.    execute: Processes a batch of records in batch Apex. 11.    finish: Finalizes processing in batch Apex....

How to create ICS/Calendar File | Helps you to download the calendar invites

  Want to know how to create ICS(Internet Calendar Scheduling) file for Business purpose....👀    ICS (Internet Calendar Scheduling) file is a calendar file saved in a universal calendar format used by several email and calendar programs, including Microsoft Outlook, Google Calendar, Notes and Apple Calendar. It enables users to publish and share calendar information on the web and over email. Lets see the code. The code is written in lwc(Lightning web component). HTML:   <template> <div class="login-container"> <h1 style="size: 14px;"><b>Create ICS File</b></h1> <div class="form-group"> <lightning-input type="datetime" name="input1" value={EventEndValue} onchange={startDate} label="Enter Start date/time value" ></lightning-input> </div> <div class="form-group"> <lightning-input type="...

Sharing records by Apex in Salesforce

  Greetings, everyone! In today's session, we'll delve into the topic of sharing records within an Apex class. As we're aware, there exist various methods through which we can accomplish the sharing of records. We engage in record sharing primarily when the object's Organization Wide Default (OWD) settings are set to private. Sharing settings come into play when certain predefined criteria are met, allowing us to extend access to records to designated groups or roles. In cases where intricate logic is involved, manual sharing is employed. While this approach proves beneficial for specific records, instances where a multitude of records require automated handling, Apex sharing becomes the preferred solution. Salesforce offers a 'Share' object for each type of object, with distinct naming conventions: For standard objects, it's 'StandardobjectName+Share', such as 'AccountShare' for the 'Account' object. Custom objects follow the pattern...

Login Salesforce Without Credentials(Without UserName and Password)

  Want to login into Salesforce without credentials. Please follow the below STEPS: STEPS:-  1)  Goto to setup  --> Open Developer Console. 2) Goto debug --> Open Execute Anonymous Window --> It will open the pop. 3) Please write the below code in Anonymous window.       String sessionId = UserInfo.getOrganizationId() + '' + UserInfo.getSessionId().SubString(15);      System.debug('$$$$ Session Id ' + sessionId); 4) Click on Execute and filter the debug. You can see one session Id with Organization Id. Now, we have to copy the debug session Id and create one login URL. Steps to create Login URL: 1) Copy the Salesforce URL. Please refer the screenshot shown below. 2) Now concatenate the session Id with the salesforce URL and your Session Id Will look like below. https://d5g000004zfq2eai-dev-ed.lightning.force.com/secur/frontdoor.jsp?sid=00D5g000004zfQ2EAI!AQgAQKzTcnQTifXpRnQ7DgECtk_rv.w9BT5FoPEAmoy_UrgG4HJ6B9YFpQ2LVlmnJhBrYPSf8cI...

SF Fact #03 | Undelete Failed, Entity is not in recycle bin

  Similar to ENTITY_IS_DELETED error, if we attempt to undelete a record from recycle bin by mistake which has already been hard deleted, the following error is encountered: UNDELETE_FAILED. When a record is deleted, it moves to the Recycle Bin. This is known as "soft deletion," allowing the record to be easily restored through the user interface. However, under certain conditions, a deleted record will no longer appear in the Recycle Bin: Master-Detail Relationship (Child Deleted First): If a record is a child or detail in a master-detail relationship and it is deleted before its parent record, then after the parent is deleted, the child record transitions to a "hard deleted" status. In this state, the child record cannot be recovered through the Recycle Bin and must be recreated if needed. Master-Detail Relationship (Parent Deleted): If a record is a child or detail in a master-detail relationship and the parent record is deleted, the child record is also soft del...